MercurJS: Host Your Own Multi-Vendor Marketplace
Shopception is here! MercurJS is a fully open-source multi-vendor marketplace platform built for customization. You define the rules, each vendor is given an intuitive dashboard to set up their product listings, and it all comes together in an included marketplace frontend. So what's the catch?

Since I have already gotten my hands dirty with Medusa and Vendure, two incredible open-source e-commerce ecosystems, it would almost be weird not to also cover Mercur. In this article, I’ll lay out all the strengths and shortcomings that Mercur brings to the table. And, as always, I've put a lot of time into creating a one-click deploy template so that you can try the entire MercurJS multi-vendor marketplace stack for yourself in just a matter of minutes, with minimal setup required.
Video
Overview
- Mercur Explained in 1 Minute
- Deploy Your Own MercurJS Marketplace with 1 click
- Next Steps: Customization and Local Development
Mercur Explained in 1 Minute

Mercur is a platform for building custom marketplaces using modern technologies, with complete feature coverage and full code ownership. It consists of five core solutions: Mercur Core, the Admin Panel, the Vendor Panel, Mercur Connect, and Mercur Storefronts, giving teams full flexibility over marketplace operations and customer experience.
If you already know what Mercur is and just want to jump straight to the quick deploy tutorial, feel free to skip ahead. But if you'd like a clear, no-nonsense overview of what Mercur actually is, who it's for, and how it works for vendors, customers, and platform owners, this section will give you exactly that. I'll lay out what each type of user can expect from Mercur, so you'll quickly understand its value and fit for your needs.
The Marketplace Owner Experience
As the owner or administrator of a Mercur marketplace, you're responsible for hosting and managing the platform. Your main job is to ensure reliable uptime, fast load speeds, and a professional setup that helps attract vendors and customers. You set the marketplace rules, approve or reject vendor sign-up requests, and manage everything through an intuitive super admin dashboard.
You also have the freedom to shape the branding and concept of your marketplace to stand out.
The stack comes with a polished default storefront themed as a clothing/fashion marketplace, but if you want to go beyond that, you’ll need development skills or access to someone who can code. Mercur gives you full control, but complex customization isn't something anyone can build quickly or without technical know-how.
If you're comfortable with coding or can work with a developer, the possibilities are nearly limitless. If not, you'll be limited to the platform’s out-of-the-box features.
The Vendor Experience
Mercur offers an ultra-low entry barrier for vendors. To start selling, all you need to do is sign up with your company or store name, email, and password, then wait for approval from the marketplace administrator, and then set up or import your products. This process is much simpler than deploying your own Medusa store. No technical skills needed, and you don't have to worry about hosting or domain setup. Anyone can start selling within minutes.
Of course, this convenience comes with trade-offs. Outsourcing marketplace management and hosting means ceding some control to the marketplace owner. You'll need to accept that they set the platform rules and have the final say in most decisions. For those valuing independence and full control, this is a significant consideration that shouldn't be overlooked.
The Customer Experience
Depending on how the marketplace owner decides to brand the platform, customers might or might not notice that products come from multiple individual vendors.
Each customer might see a different catalog of products depending on their geographical region, since not all vendors ship everywhere. But otherwise, the shopping experience feels like any other webshop operating from a single warehouse.
However, if the marketplace owner wants to emphasize each vendor's uniqueness (think Etsy), it's entirely possible to brand the platform that way too.
The bottom line: Customers use one web interface to buy from multiple vendors, with the same checkout flow and payment options no matter what they purchase.
The Developer Experience
For anyone who enjoys working with a modern tech stack (Node.js and TypeScript), the developer experience is about as good as it gets. Beyond that, MercurJS is built on top of MedusaJS (2.x), so if you've worked with Medusa before, you’ll feel instantly at home.
To put that in perspective, my deployment automation library, which I originally created for MedusaJS projects, worked with Mercur right out of the box.
MercurJS retains Medusa’s developer‑first philosophy: modular, extensible, and designed to give developers full control over how features are built and integrated. Whether you're adding custom logic, connecting external APIs, or extending core functionality, MercurJS gives you the freedom to build things your way.
For developers that aren't familiar with Medusa, there's definitely a bit of a learning curve to get started, however, the documentation has been going through a major overhaul recently, and the built‑in AI assistant on the Medusa docs is genuinely helpful. I've used it countless times while working with Mercur, both to clarify concepts and to debug tricky implementation details.
This is an article about MercurJS, but hey... Shout out to the Medusa team! 👏
Final thoughts
It's pretty remarkable that you can build a fully functional multi‑vendor marketplace on a free, open‑source foundation. Platforms like this are usually built for serious operations, multiple vendors, real transaction volumes, and complex infrastructure, not side projects or small merch stores. The fact that MercurJS makes that level of capability accessible to independent developers is impressive.
That said, Mercur isn't just another webshop starter kit. It's designed for more ambitious projects than I usually approach; the kind of marketplace where scalability, vendor management, and automation actually matter. For small or traditional webshops, Medusa (or Vendure) might still be the better fit. But for developers or teams building marketplaces, MercurJS delivers an incredible head start.
From a technical standpoint, my experience with MercurJS has been positive, with no serious red flags. I did encounter a few hiccups during CLI setup, the kind you expect with projects of this complexity. However, it was running locally within half an hour and felt stable.
I haven't performed a large‑scale stress/load test because of how complex and time-consuming that is to do, but given the underlying Medusa architecture, scaling should be a solved problem, simply by adding more worker instances when needed.
If your project calls for a multi‑vendor marketplace, MercurJS is absolutely worth exploring. It's rare to see this much capability and polish available completely open‑source, especially for something this advanced.
Deploy Your Own MercurJS Marketplace with 1 click
As usual, I've put some time and effort into streamlining and automating the deployment process, so you don't have to fiddle with any configuration or setup. In just a few minutes, you can have a fully working MercurJS marketplace deployed in the cloud and see it in action for yourself.
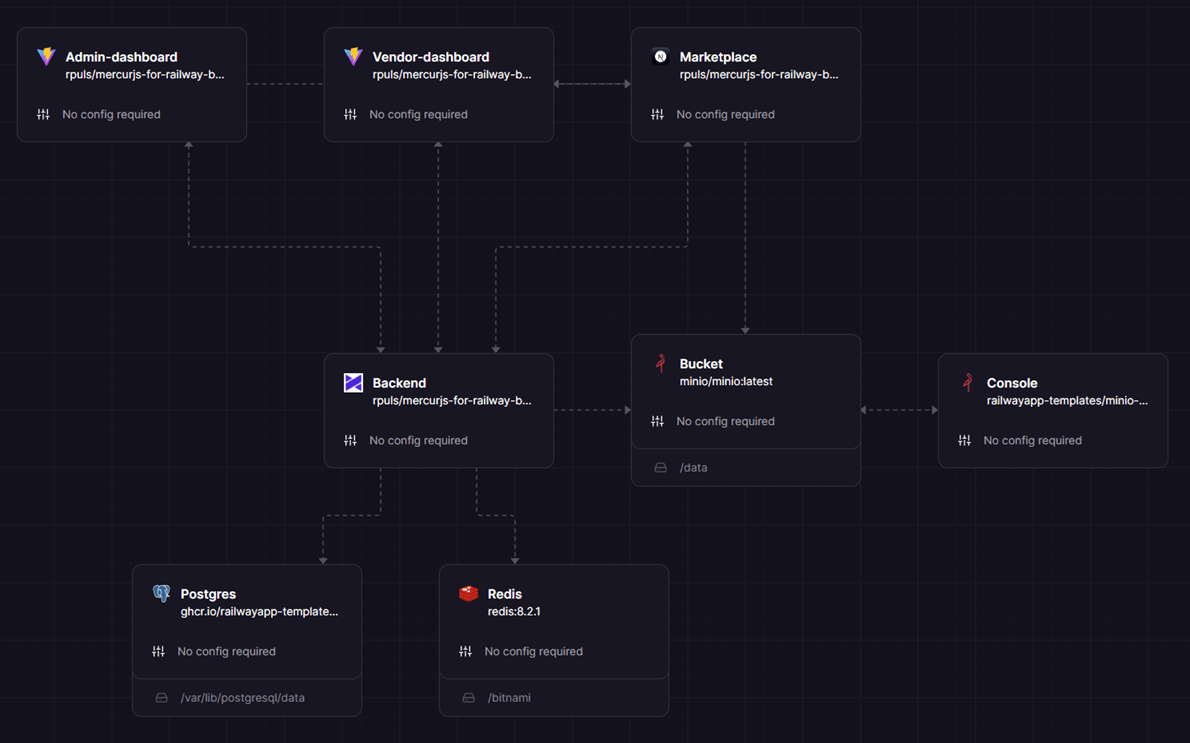
The entire stack, as seen in the diagram above, can be launched with just one click.
Prerequisite
- GitHub account
- Railway account (connected with GitHub)
- Railway Hobby plan ($5/month)
This is enough for you to deploy the template, it will build and provide you with all the individual dashboards and the marketplace storefront, BUT, the Mercur platform also really depends on a few other, optional, but recommended pieces to get the most out of it. If you are planning on accepting payments, sending automated emails, and offering a product search engine. A few API keys can be added during the deploy process. The following optional dependencies are:
- Algolia search engine API key (Recommended for testing)
- Stripe payment API key (can be added later, not needed for testing)
- Resend emailing API key (can be added later, only needed for email sending)
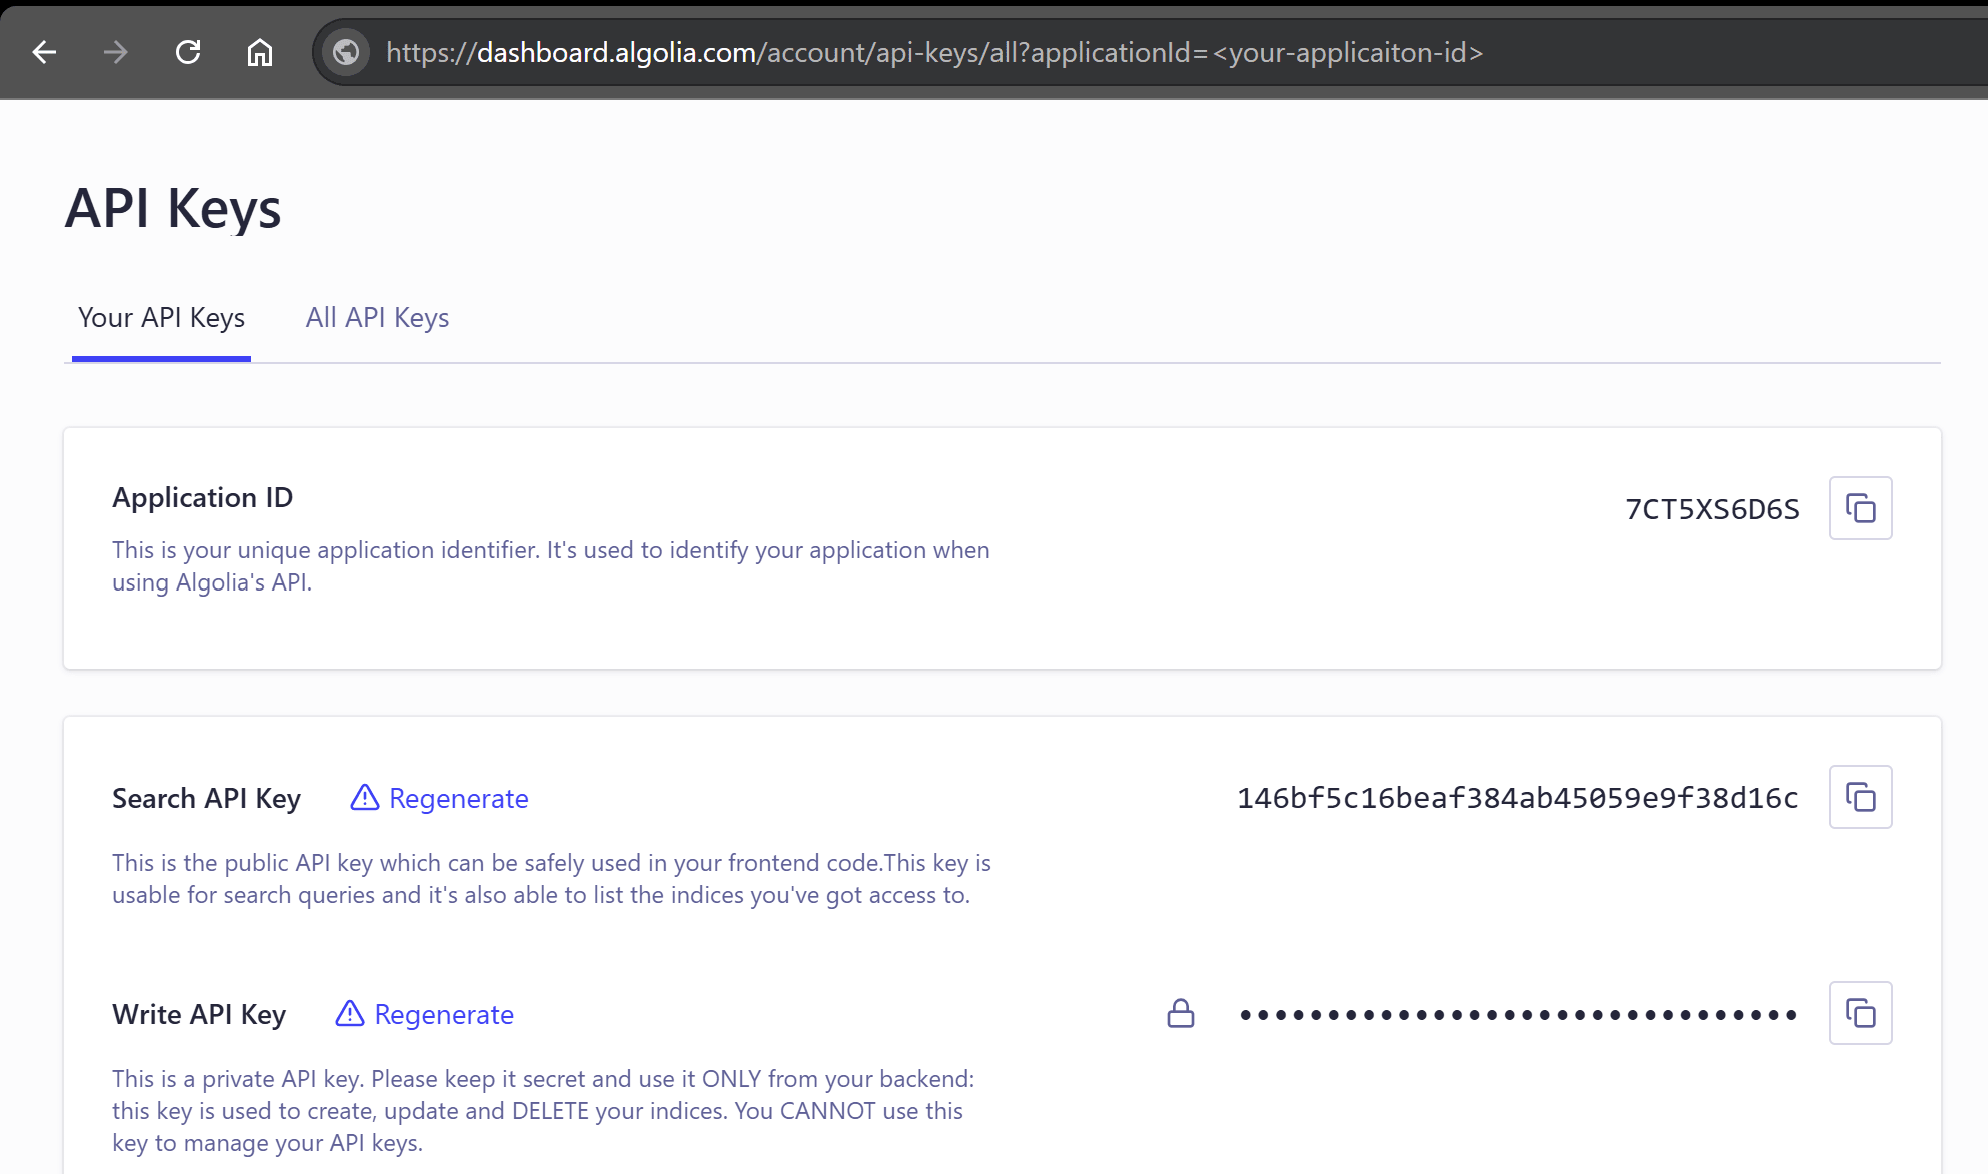
Protip: Ignore Stripe and Resend right now, but make sure to get your Algolia API key ready. It's really easy to sign up, you can use your existing GitHub account to. That's what I did. If you happen to already have Stripe and Resend API keys, feel free to add them during the deployment, but if not, wait until you actually need to start sending emails and accepting payments. Links to Stripe and Resend signup and configuration guides can be found at the bottom of this article. For now, just sign up with Algolia, and go the the API key dashboard.
Keep this tab open, you will need it in the next step.
Deploy
You are now ready to start the template deployment. Click the button below to go to the template overview.
 MercurJs
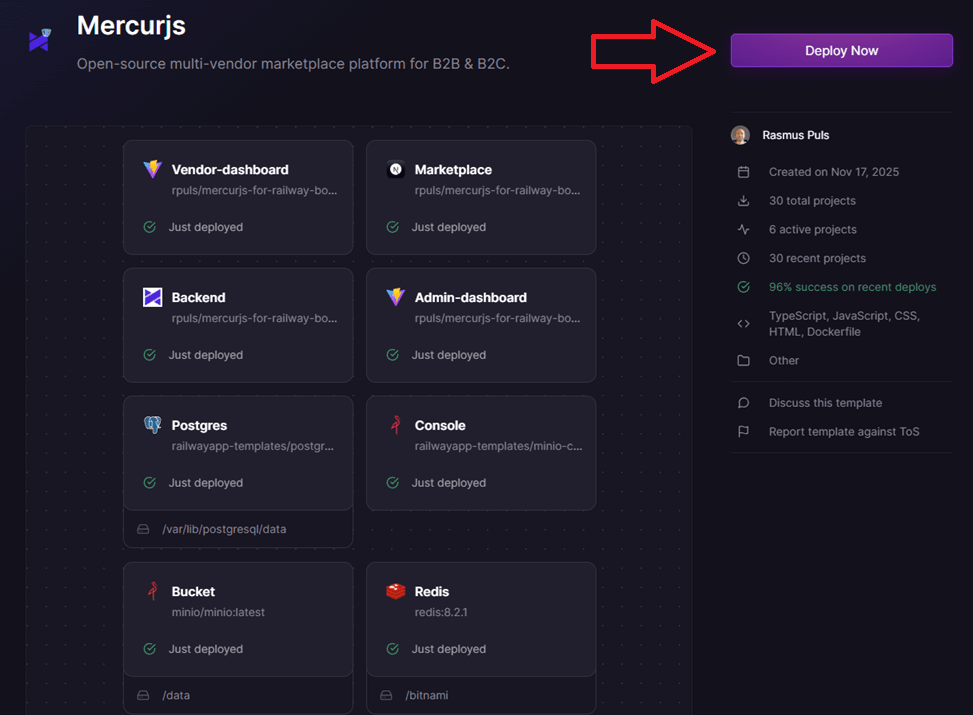
Once you click the deploy button on the template overview, you will be taken to the initial setup page. As mentioned above, the template will build and deploy without doing anything in this step, but if you want to full experience, add your Algolia details.
Expand the Marketplace container, and add your Algolia Application ID in the NEXT_PUBLIC_ALGOLIA_ID field, and add Search API Key in the NEXT_PUBLIC_ALGOLIA_SEARCH_KEY field. Click Save Config.
Then, expand the backend, and add your Algolia Application ID in the ALGOLIA_APP_ID field, and add Write API Key in the ALGOLIA_API_KEY field. Click Save Config.

This is where you provide all the API keys prior to deploy, but as I mentioned earlier, it's easy to add the Stripe and Resend API keys later. Once you have added your Algolia keys and application ID and saved, click the "Deploy Now" button.
This will start the automated deploy process, which will take at least 10 minutes, longer is also normal. I don't want to go too much into details about how I automated the deployment process right now, but I do want to mention that this was made possible with my medusajs-launch-utils library, which is used in all of my other MedusaJS templates. It provides some helper functions, such as cross-service API key sharing and build queueing, which make deployment on Railway easy.
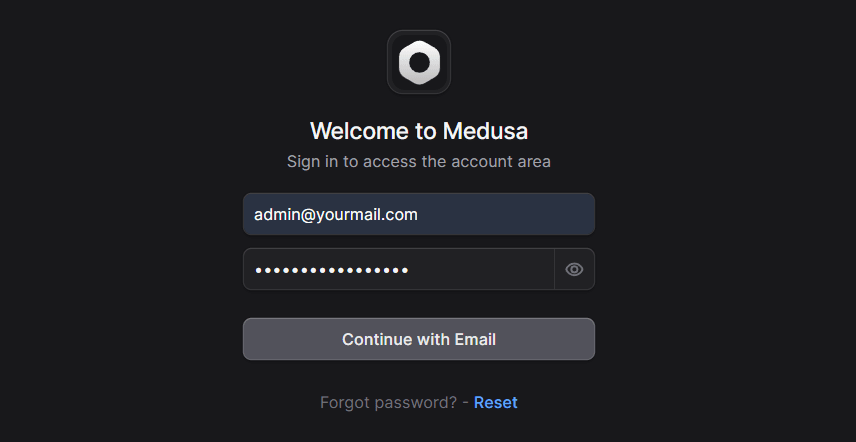
Log in to your Admin Dashboard
Once you have all green checkmarks, you are ready to log in to your admin dashboard.
To do that, you first need to locate your admin user credentials, which can be found on the Backend service, in the Variables section.

Next, open up the login page. You'll find the URL on the Deployments section on the Admin-dashbaord service.
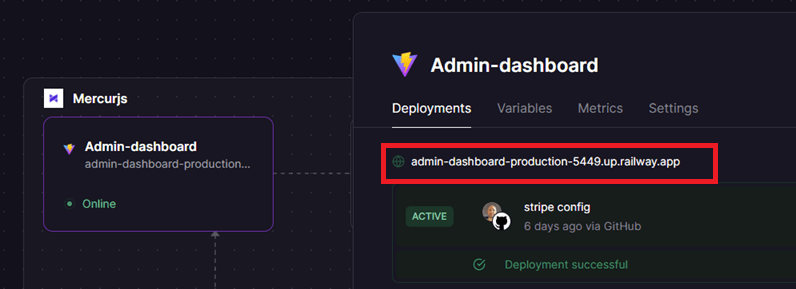
Clicking this link will take you to the login page. Paste your credentials and log in.
That's it! You are done with the cloud setup 🥳
Next Steps: Customization and Local Development
Once you've tested your Mercur marketplace in the cloud and confirmed everything works as expected, it's time to take ownership of the codebase. The next steps walk you through ejecting the project from the deployment template, running it locally, and preparing it for real‑world use, including setting up payments and automated emails.
Eject Template to Make Customizations
When you deploy the Railway template, all app instances are initially linked to my public GitHub repository. To make changes, you'll need your own version of the code. That's exactly what the Eject button does, it tells Railway to create a personal GitHub fork of the project under your account. You can find it under Source Repo in the Settings section on the Backend service.
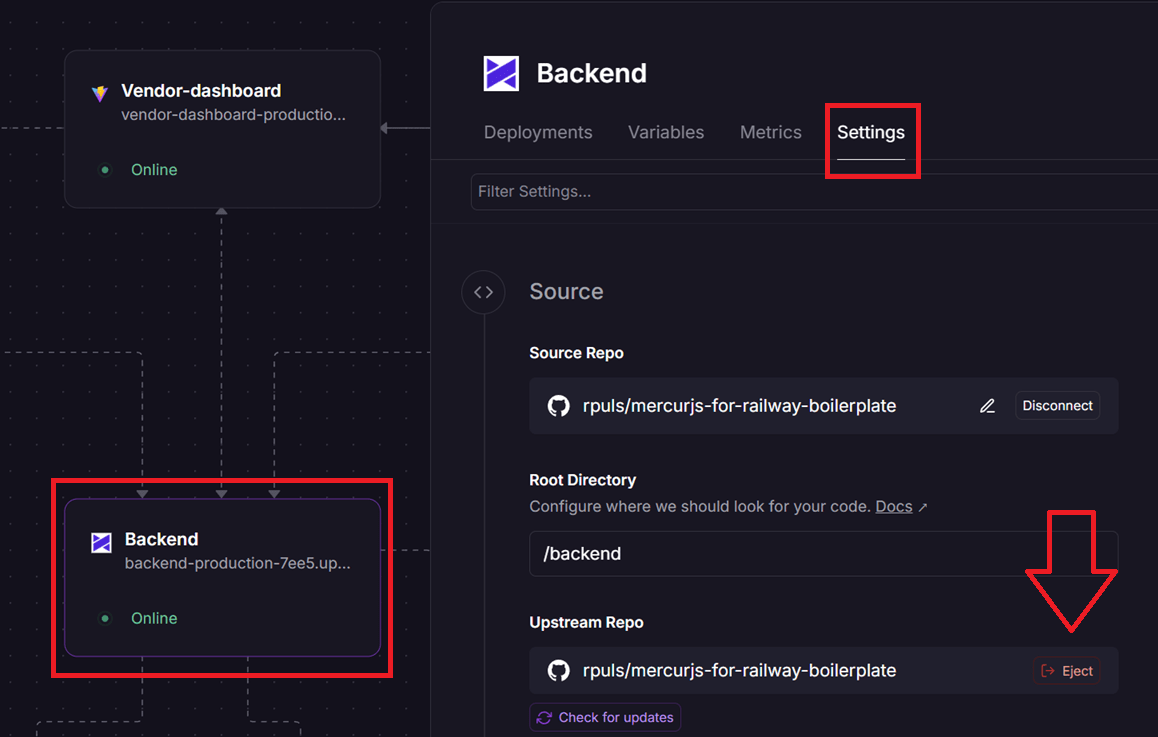
Once ejected, your deployment pipeline will use that fork as its source repository, giving you full control to edit, push updates, and customize as you like.
(This is also why the prerequisite step recommends signing up to Railway using your GitHub account, it allows Railway to create the fork on your behalf.)
Run the Project Locally
Once you’ve ejected the template and Railway has created your personal GitHub fork, you can clone that repository to your local machine. This gives you full access to the code for development, debugging, and customization.
For detailed setup steps, including environment variables, dependencies, and commands, check the latest instructions in the GitHub README. It's kept up to date with any changes or requirements.
Stripe and Resend Integration
If you've made it this far and want to take your MercurJS project beyond testing, adding support for payments and automated emails is the next logical step. MercurJS uses Stripe for payments and Resend for transactional emails, both optional during early setup but essential for any real, production‑ready marketplace.
I've previously written guides on how to integrate these services with MedusaJS 2.0, and while they're not written specifically for Mercur, the setup process is nearly identical. They should still serve as a helpful reference when you’re ready to configure these integrations:
Stripe

Resend

Got Questions or Need Help?
For quick or simple questions, you’re welcome to leave a comment on the YouTube video.
If you're dealing with something more complex, like sharing logs, screenshots, or troubleshooting setup issues, post your question in the discussion forum dedicated to the deploy template.